Kalla Progress
Some progress has been made. I've been adding paperclay and sanding it away to make the face more symmetrical, while sanding and carving the excess parts around the face. It looks better, but some of it is just from the smoother surface now, thanks to that fine grind.
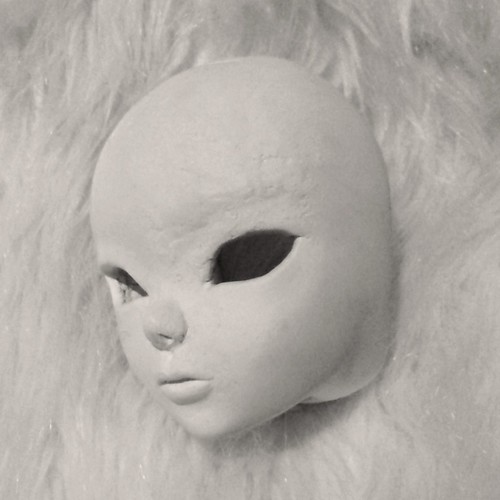
I'm currently adding some more clay to this side of the face, hence the rougher surface above the eye. It is hard work, turning the head around in my hands, finding those small irregularies and trying to patch them up. I know it'll never be truly symmetrical, but I just want the details that show to eye easily be good.
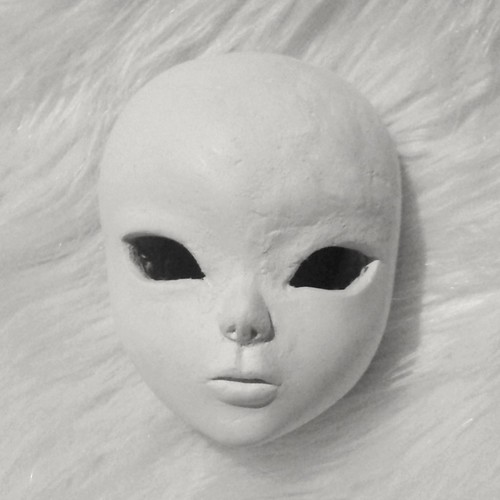
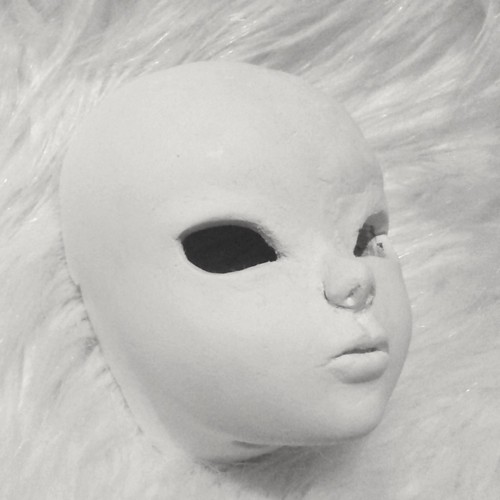
I've also been adding a lot of clay to the lips, to make them fuller, but they are still a bit lopsided, as is the nose. I'll just keep on working on those untill I get it right! Same with the eye shape. I'm just currently doing them one by one, getting something right on one side, then trying to mimic it on the other side. There's just so many angles to think about, so it takes a lot of trial and error to make them symmetrical. I think once I get to sand the left eye so that it is on the same level as the other thicknesswise, I'll add some more clay to the right one so that the upper lid shape is the same as the left's. Now it rises a bit too much at the corner.
And oh yes, since last photos, I filled in a lot to the inner corners of the eyes, so that they wouldn't be so close together. I think current positions are ok, what do you think?

From the side the lips and nose look just fine. I just have no idea how I'm going to make the lips look full from the front as well... Sure, some of it is due to face-up to make it show, but I need some more volume to the upper lip.
As you can probably see, I have also started carving the inside of the head, to make some preliminary eye wells. Without a proper bevelling tool however, I can't take pictures with eyes any time soon. And I still have a lot of work with the eyes anyway. I need to make the edges symmetrical and sharp. Then there's still the unexplored territory of ears. I think I'll try to tackle them by doing some sort of spirals with a rolled up piece of clay. Try to make the basic structure as symmetrical in basic shape and position as possible right from the start. But to do that, I first need the rest of the head shape ready, so that it'd be easy to configure the right position for them ears.
Oh, and don't get me started on how I am even thnking of making the headcap...No idea yet, especially on how to make it stay on the head :P

I think the eyes position now it's good, I really like the advance pics, she looks much smoother and pretty, I agree the upper lip needs some more volume, the bottom ones are really full and nice in comparison.
VastaaPoistaKeep up the good work, I'm loving it so far :D
I'm still working on the upper lip. I might need to look at multiple blank sculpt pictures to figure out how to make it look good to my eye.
VastaaPoistaThe eye shapes are already looking good after some more modifications and I hope the fix I'm doing now will make the nose as I want it to be.
Then I need to think a bit of the brow. It's very smooth atm, to allow multiple expressions depending on the eyebrows. but it might be a bit too smooth, as in the face has no character of its own... Well, you'll see it in the next round of pictures, once I get these current things done :)
Looking really good! I think you've managed to keep the wanted profile-shape well intact. The sanded side of the face looks like it's shaping up real nicely, well done~ It'll be interesting to see what the head will look like with eyes. :3
VastaaPoistaThe headcap seems tricky to do... :-O Have you looked up any tutorials on how to make it? I'm thinking about trying to make a doll of my own someday too. I suppose it might be an animal doll because I'm more familiar with sculpting animals. What kind of paper mache are you using?
I haven't seen any tutorials on how to make headcaps, not that I' been actively looking for them. I think there might be some for making Unoa headcaps, but with those the mechanism is already there, one just needs to make the locking piece. Here I have to figure out my own locking system, since I would rather not use magnets with it.
VastaaPoistaAmd I'm just using the cheap paperclay that can be bought from bookstores. It's fine for the general shape, but tricky for the smaller details. So many of those have been made by adding extra clay and then using a fine knife to carve the wanted shape. Once I get around to the priming stage, I think I'll try to add possible details with apoxy if still needed. Apoxy probably wouldn't stick to paperclay on its own, since the surface is now very pulvery.
Ooh I see. Well if you're using cheap paperclay then I'm very impressed. I've tried those and they are extremely hard to work with. I'd recommend Sculpey that you can find in craft-stores. It is very easy to sculpt, even better than real clay, especially if you want to add smaller details. I'm not sure what it would do when attached to paperclay, though...
VastaaPoistaThe problem I have with both Sculpey amd Fimo is that they both harden in the oven. I prefer airdrying for a project like this where I have to do the sculpting in parts and want the base to be totally solid before making new additions. Also I think that Sculpey detracts in the oven? Paperclay keeps the same approximate size when drying so that I don't have to worry about the porpotions later on (once I start to fit the necksize onto a body for instance).
VastaaPoistaThere are also types of Sculpey that are of the air-drying kind which don't detract.
VastaaPoistaBut it seems that you're good at sculpting details with this paperclay. :3